


While writing Unit Tests, we often verify that given an input, the output of the method under test is the one expected. When you execute the same test with a different set of inputs and expected outputs several times, you come up with Data Driven Tests or Parameterized Tests.
In this first post I will explain how we can multiply not only the quantity, but also the quality of our tests with this methodology. The samples are in Junit5 and written in Kotlin but apply to Java as well.
*To configure Junit5 in Android projects (which I strongly recommend at least for JVM tests), you can find a complete guide here
A common test case: a password validator
Nowadays, most apps require the user to create an account with a "strong password". Let's assume we need to validate on the client side that the user provides a strong password, namely:
- Contains at least 1 char in upper case. Show "must contain upper case letters" otherwise
- Contains at least 6 chars. Show "must contain at least 6 chars" otherwise
- Contains at least 1 digit. Show "must contain digits" otherwise

Although you can take another approach to implement it, I've used a Composite pattern: PasswordValidator (Composite) and Validators (Leaves) that accepts a vararg of Validators (Leaves) as argument in its constructor, each value validating one single requirement.
In order to test that our Password validator works, we write a single test with an assert for each requirement as follows
@Test
fun passwordValidatorTest() {
    val minCharsCount = 6
    val passwordValidator = PasswordValidator(
        ContainsUpperCaseLetterValidator(),
        MinCharsValidator(minCharsCount),
        ContainsDigitValidator()
    )

    assertThat(
        passwordValidator.validate("123456")
    ).contains("must contain upper case letters")

    assertThat(
        passwordValidator.validate("1234A")
    ).contains("must contain at least $minCharsCount chars")

    assertThat(
        passwordValidator.validate("ABCDEF")
    ).contains("must contain digits")
}
If you are not new to Unit Tests, I'm sure you have heard that you should strive to have only one assert per test. In doing so, your tests are self-contained and clearly state what is being tested.
Moreover, asserts fail hard by default in Junit5. It means, whenever one assert fails, the test execution exits right away with the corresponding error. The subsequent asserts in the tests will not run and therefore no further errors will be reported.
Soft Assertions would solve that problem though (assertAll in Junit5), but it does not scale well in this case. Tests would continue becoming longer and longer.
For instance, imagine that after a while, the requirements for a strong password get more strict and we also need to validated the following on password creation:
- Contains at least 1 char in lower case. Show "no lower case letters" otherwise
- Contains no blanks. Show "contains blanks" otherwise
While adding the corresponding validators, our test becomes this:
@Test
fun advancedPasswordValidatorTest() {
    val minCharsCount = 6
    val passwordValidator = PasswordValidator(
        ContainsUpperCaseLetterValidator(),
        MinCharsValidator(minCharsCount),
        ContainsDigitValidator(),
        ContainsLowerCaseLetterValidator(),
        NoBlanksValidator()
    )

    assertThat(
         passwordValidator.validate("123456")
     ).contains("must contain upper case letters")

     assertThat(
          passwordValidator.validate("1234A")
     ).contains("must contain at least $minCharsCount chars")

     assertThat(
          passwordValidator.validate("ABCDEF")
     ).contains("must contain digits")

     assertThat(
          passwordValidator.validate("HELLO")
     ).contains("must contain lower case letters")

     assertThat(
          passwordValidator.validate("12 3 456")
      ).contains("must not contain blanks")
}
*You can find the complete set of initial and advanced strong password samples with multiple asserts here
At a glance, we notice the following:
- The test becomes longer: long code is generally more complicated, harder to read, and harder to maintain. The more requirements, the longer it becomes due to the extra asserts.
- The test becomes less focused: the more password requirements, the more asserts added. The more asserts, the harder to see what the test is actually validating.
One test per requirement
brief and focused tests! ...but repetitive
By creating one test per requirement we would solve both issues. Every test would assert only one thing. If a test fails, we know directly what is failing.
val passwordValidator = PasswordValidator(
     ContainsUpperCaseLetterValidator(),
     MinCharsValidator(6),
     ContainsDigitValidator(),
     ContainsLowerCaseLetterValidator(),
     NoBlanksValidator()
 )

@Test
fun passwordValidatorNoUpperCaseTest_showsError() {
    assertThat(
         passwordValidator.validate("123456")
     ).contains("must contain upper case letters")
}

@Test
fun passwordValidatorNoLowerCaseTest_showsError() {
     assertThat(
          passwordValidator.validate("HELLO")
     ).contains("must contain case letters")
}

@Test
fun passwordValidatorNoDigitsTest_showsError() {
     assertThat(
          passwordValidator.validate("ABCDEF")
     ).contains("must contain digits")
}
...
*You can find the full set of tests with one assert here
On the other hand, all tests look very repetitive. If we add more requirements, the new tests are basically a copy-paste of any of the previous tests but with different input and expected output values. They do not scale well.
We can do better. That's where Parameterized Tests come in handy...
Parameterized Tests
brief and focused tests, but also concise and scalable!
Parameterized Tests enable us to execute a single test method multiple times with different parameters. In Junit5, we can use the @ParameterizedTest annotation for that purpose. In doing so, we can pass as input the password under test and its expected error message, solving the problems we were facing.
And the resulting Parameterized Test would look like this:
val passwordValidator = PasswordValidator(
     ContainsUpperCaseLetterValidator(),
     MinCharsValidator(6),
     ContainsDigitValidator(),
     ContainsLowerCaseLetterValidator(),
     NoBlanksValidator()
 )

@DisplayName("PasswordValidator for invalid passwords")
@ParameterizedTest(name = "When password is \"{0}\", the error contains \"{1}\"")
@CsvSource(
    "123456, must contain upper case letters",
    "ABCDEF, must contain digits",
    "HELLO, must contain lower case letters",
    "1234A, must contain at least 6 chars",
    "12 3 456, must not contain blanks"
)
fun testPasswordValidatorRight(password: String?, expectedError: String?) {
    val actualError = passwordValidator.validate(password)
    assertThat(actualError).contains(expectedError)
}
*You can find the complete set of Parameterized Tests here
Apart from
@CsvSource, Junit5 comes with other annotations to provide inputs, such as@CsvFileSource,@EnumSourceor even@MethodSourcefor more complex input sets. You can take a deeper look at them here to find which one fits your needs better.
And if we run the test, we get the following result:
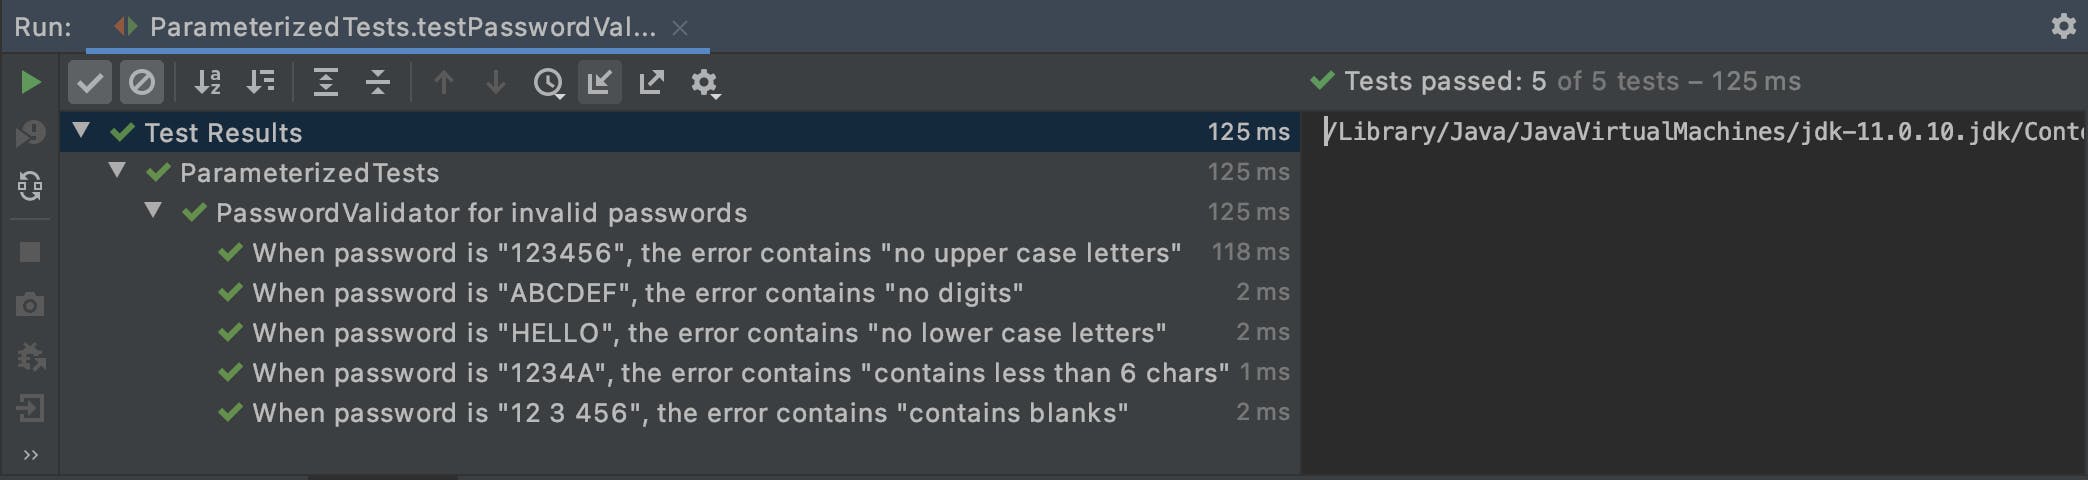
As you can see, parameterizing your tests has the following advantages:
- Your tests are scalable: every new requirement involves adding one new pair of input and expected output to the parameters we inject into the tests.
No more copy-pasting of tests.
And what if you need to add an edge case you forgot? No need for extra asserts or extra tests. Again, simply add new data to your test. - Your tests are concise: the names of the tests become more concise since they can include the value of the parameters. What tells more about what we are actually testing? What tells the sheer truth? passwordValidatorNoDigitsTest_showsError or When password is "ABCDEF", the error contains "no digits"?
With Parameterized Tests, your tests are still brief and focused like before, but they are more concise and scale better! You have not only multiplied its quantity with ease, but also its quality!
Conclusion
As we've seen in the samples, whenever you find yourself writing a test with multiple asserts, consider whether it makes sense to create one test per assert instead. That way your tests will be shorter, more focused and more readable.
If after splitting the original tests into several, you find out that you can group the tests by extracting some common code into parameters, Parameterized Tests will also help your tests scale much better, while being brief and focused. They'll also become more concise by using its parameters to build the test name.
However, do not fall into the trap of excessive generalization. Do not write tests that take too many arguments as parameters. If you end up with Parameterized Tests whose names are too general or hard to understand, try to split them into separate Parameterized Tests (or even simple tests) with less parameters. Take a look at how I grouped the Parameterized Tests here instead of merging all of them into one.
Last but not least, remember that tests are also documentation. Therefore, they need to be understandable, you never know who will have to fix those tests if they fail!
*You can find the validators code and a more complete collection of the strong password test samples in this repo.
What comes next
In the following article of this series, we will explore Property-Based Tests and how they can help us make our Password validator tests more robust. Available on the link below!
If you liked this article, you might also like other articles I wrote on snapshot testing on Android:
among others...