


Snapshot testing (also called screenshot testing) has been in the Android world for a while, since 8th October 2015, when Facebook open sourced the first version of their snapshot testing library.
They are a special type of UI tests that inflate a view, take a screenshot of it, and compare it to an already stored image taken as reference. If they differ, the test fails, passes otherwise.
It is also worth mentioning that snapshot tests are not meant to replace UI tests. On one hand, standard UI tests focus on testing view interactions and navigation to the right screens. On the other hand, snapshot tests focus on the look of the view in a certain state.
Snapshot tests are not as costly to write and maintain as standard UI tests, and much faster to run, allowing faster feedback for developers. According to the numbers reported in the book "Building Mobile Apps at scale - 39 Engineering Challenges", snapshot tests are more widely used than UI tests by a lot of big companies:
- Airbnb: ≈ 30.000 snapshot tests
- Uber: thousand of snapshot tests vs. a handful of UI tests
- Spotify: ≈ 1.600 snapshot tests vs. ≈ 500 UI tests
- Shopify: ≈ 2.300 snapshot tests vs. ≈ 20 E2E tests
At my previous company, CHECK24, the biggest comparison portal in Germany, we also had similar numbers in the last projects I worked on:
- MoneyTracker: ≈ 400 snapshot tests vs. ≈ 30 UI tests
- C24 Bank: ≈ 800 snapshot tests vs. handful of UI tests
So, how can snapshot tests help improve the quality of our app?
Motivation
Screenshot testing excels at detecting visual changes across commits. The main motivation behind is that it can catch visual regression bugs that standard UiAutomator and Espresso cannot.
With regression bugs we mean things like:
- Unexpected changes introduced by a library version change, as happens from time to time with MaterialDesign components.
- Spacing, styles and themes, text styling, etc.
- Layout correctness
- how edge cases are displayed (e.g. very long text vs. text == null)
- ensure no view overlapping on visibility changes
- view alignment under different screen densities and/or font sizes,
- very verbose languages or those with special properties like RTL (right-to-left), non-latin alphabets or scripts, etc.
All these visual properties are pretty easy to verify with Screenshot testing and quite difficult or impossible to assert with UiAutomator or Espresso. While these Frameworks assert whether a View is shown, they cannot assert how the View is displayed. That's what Snapshot Testing is for.
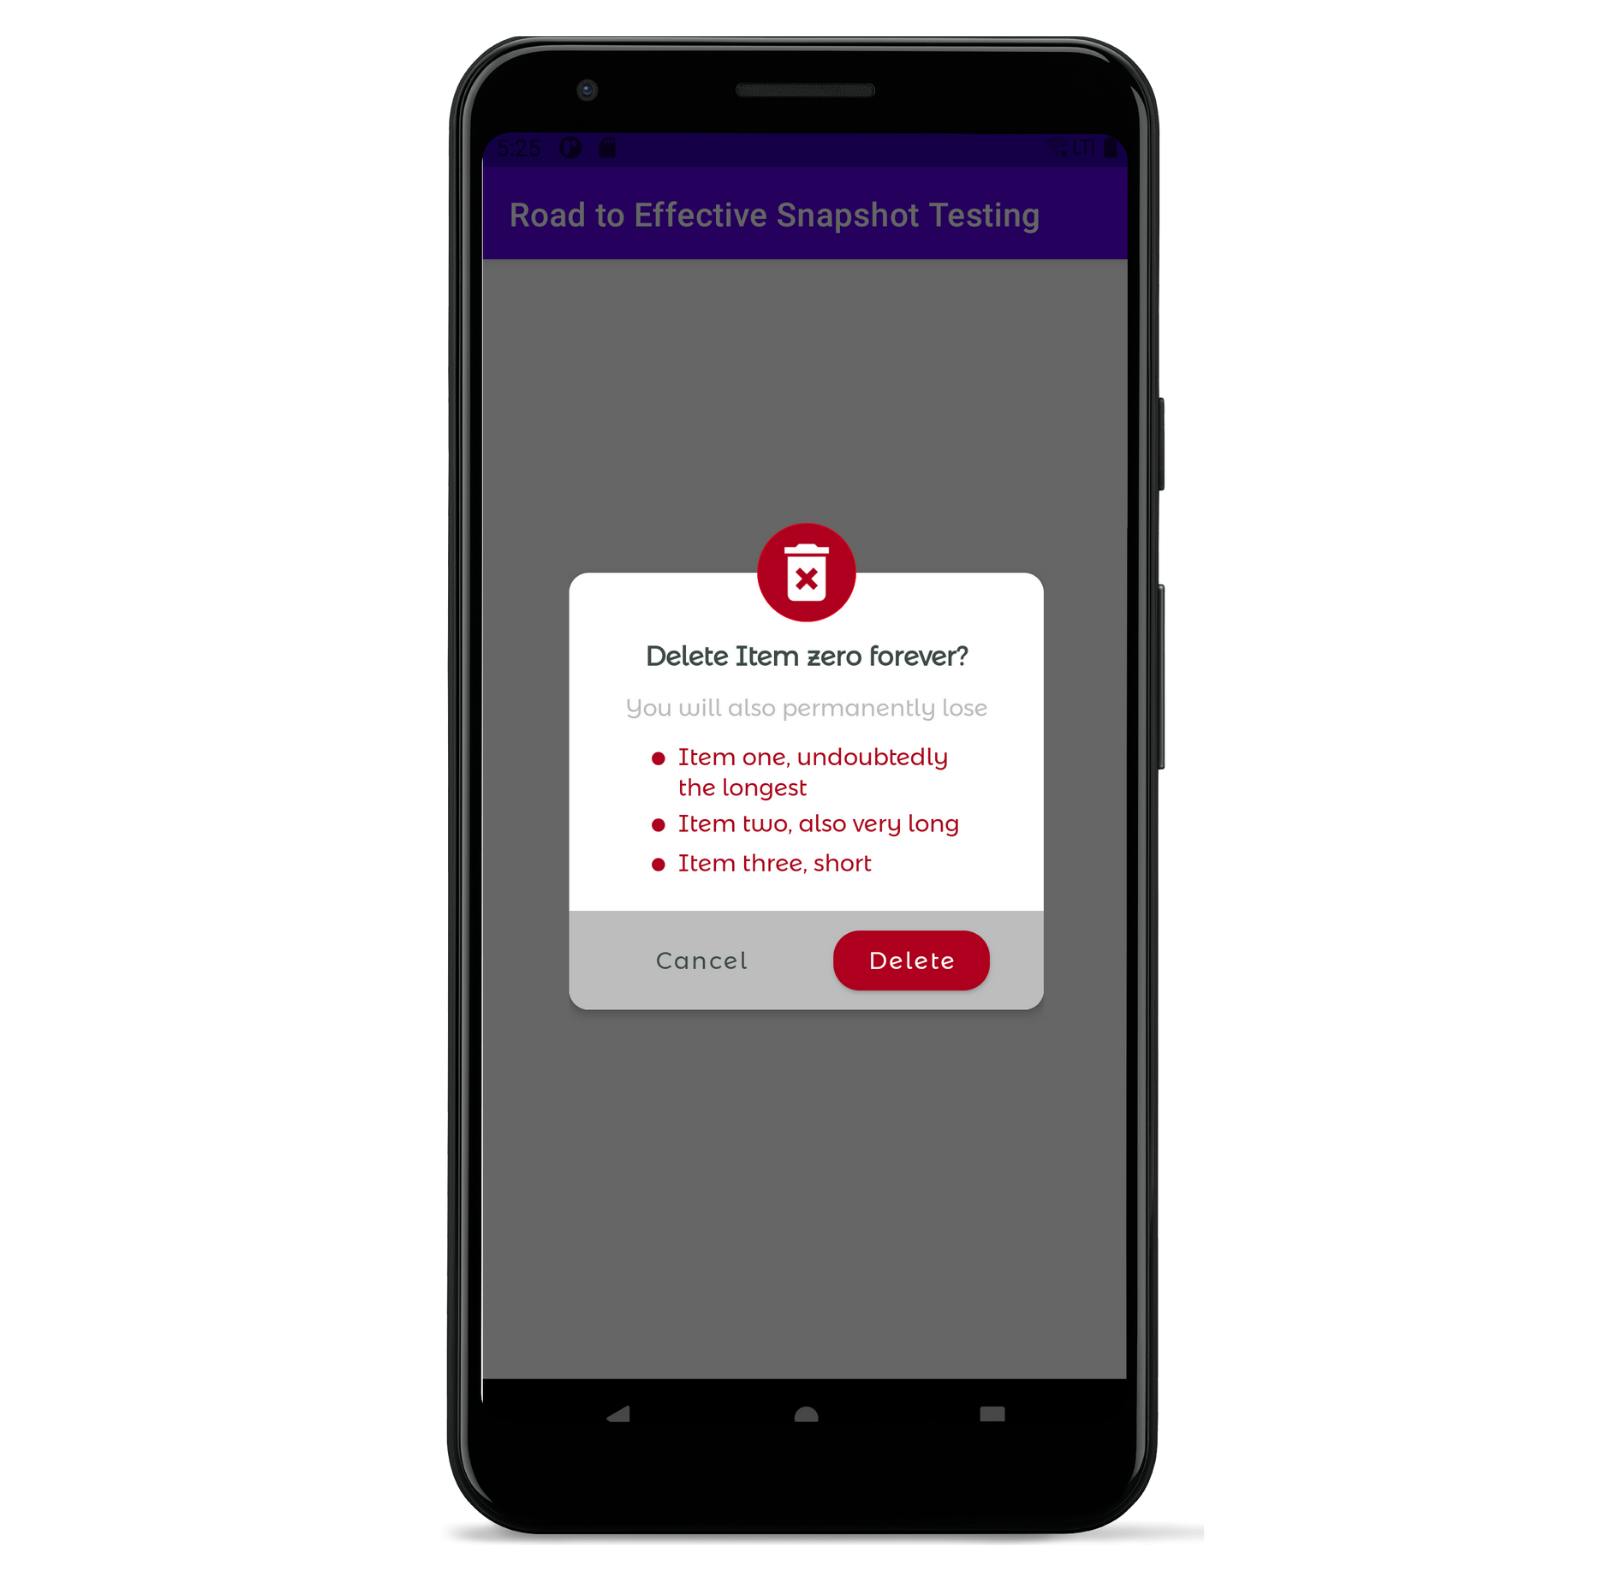
But you might still think we do not encounter those issues that often. So let's imagine we have a "Delete item dialog" as in the pic below. You can find the xml layout here.
The layout looks like this on a device
So... everything looks fine. However, this just represents our layout without any special configuration. For checking other configurations, Android Studio comes with Layout Validation. It enables us to preview our layout under numerous settings in a couple of clicks. Based on my experience, large and huge font sizes are one of the main sources of visual bugs mainly due to bad view constraints when using ConstraintLayouts. So if we check it in the Layout Validation...
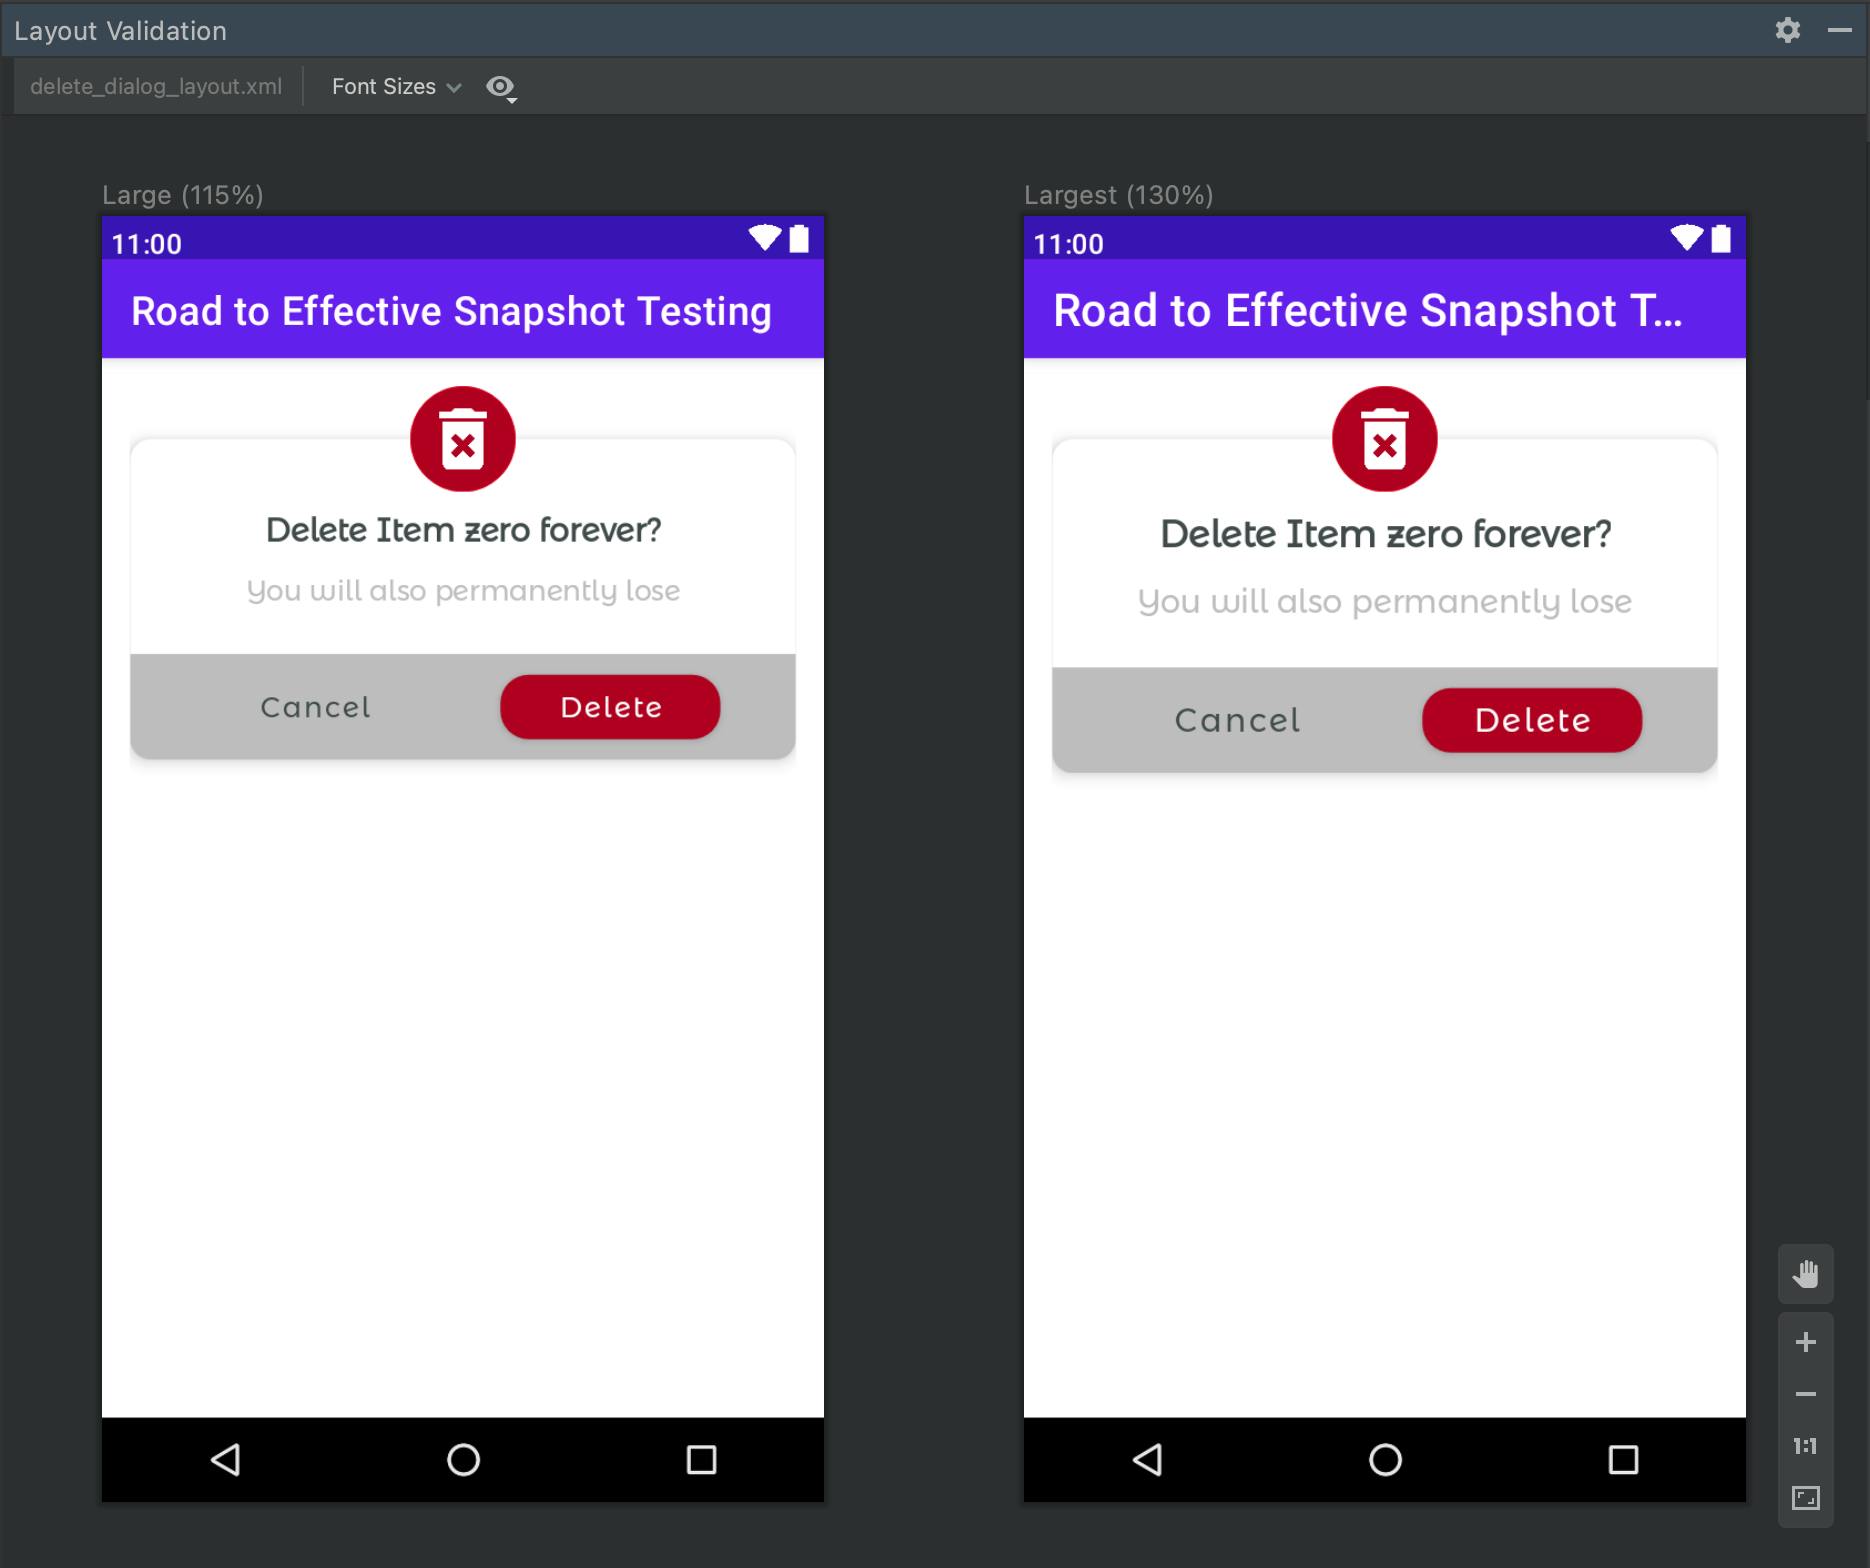
The views we add dynamically are not displayed, but apart from that, it looks fine.
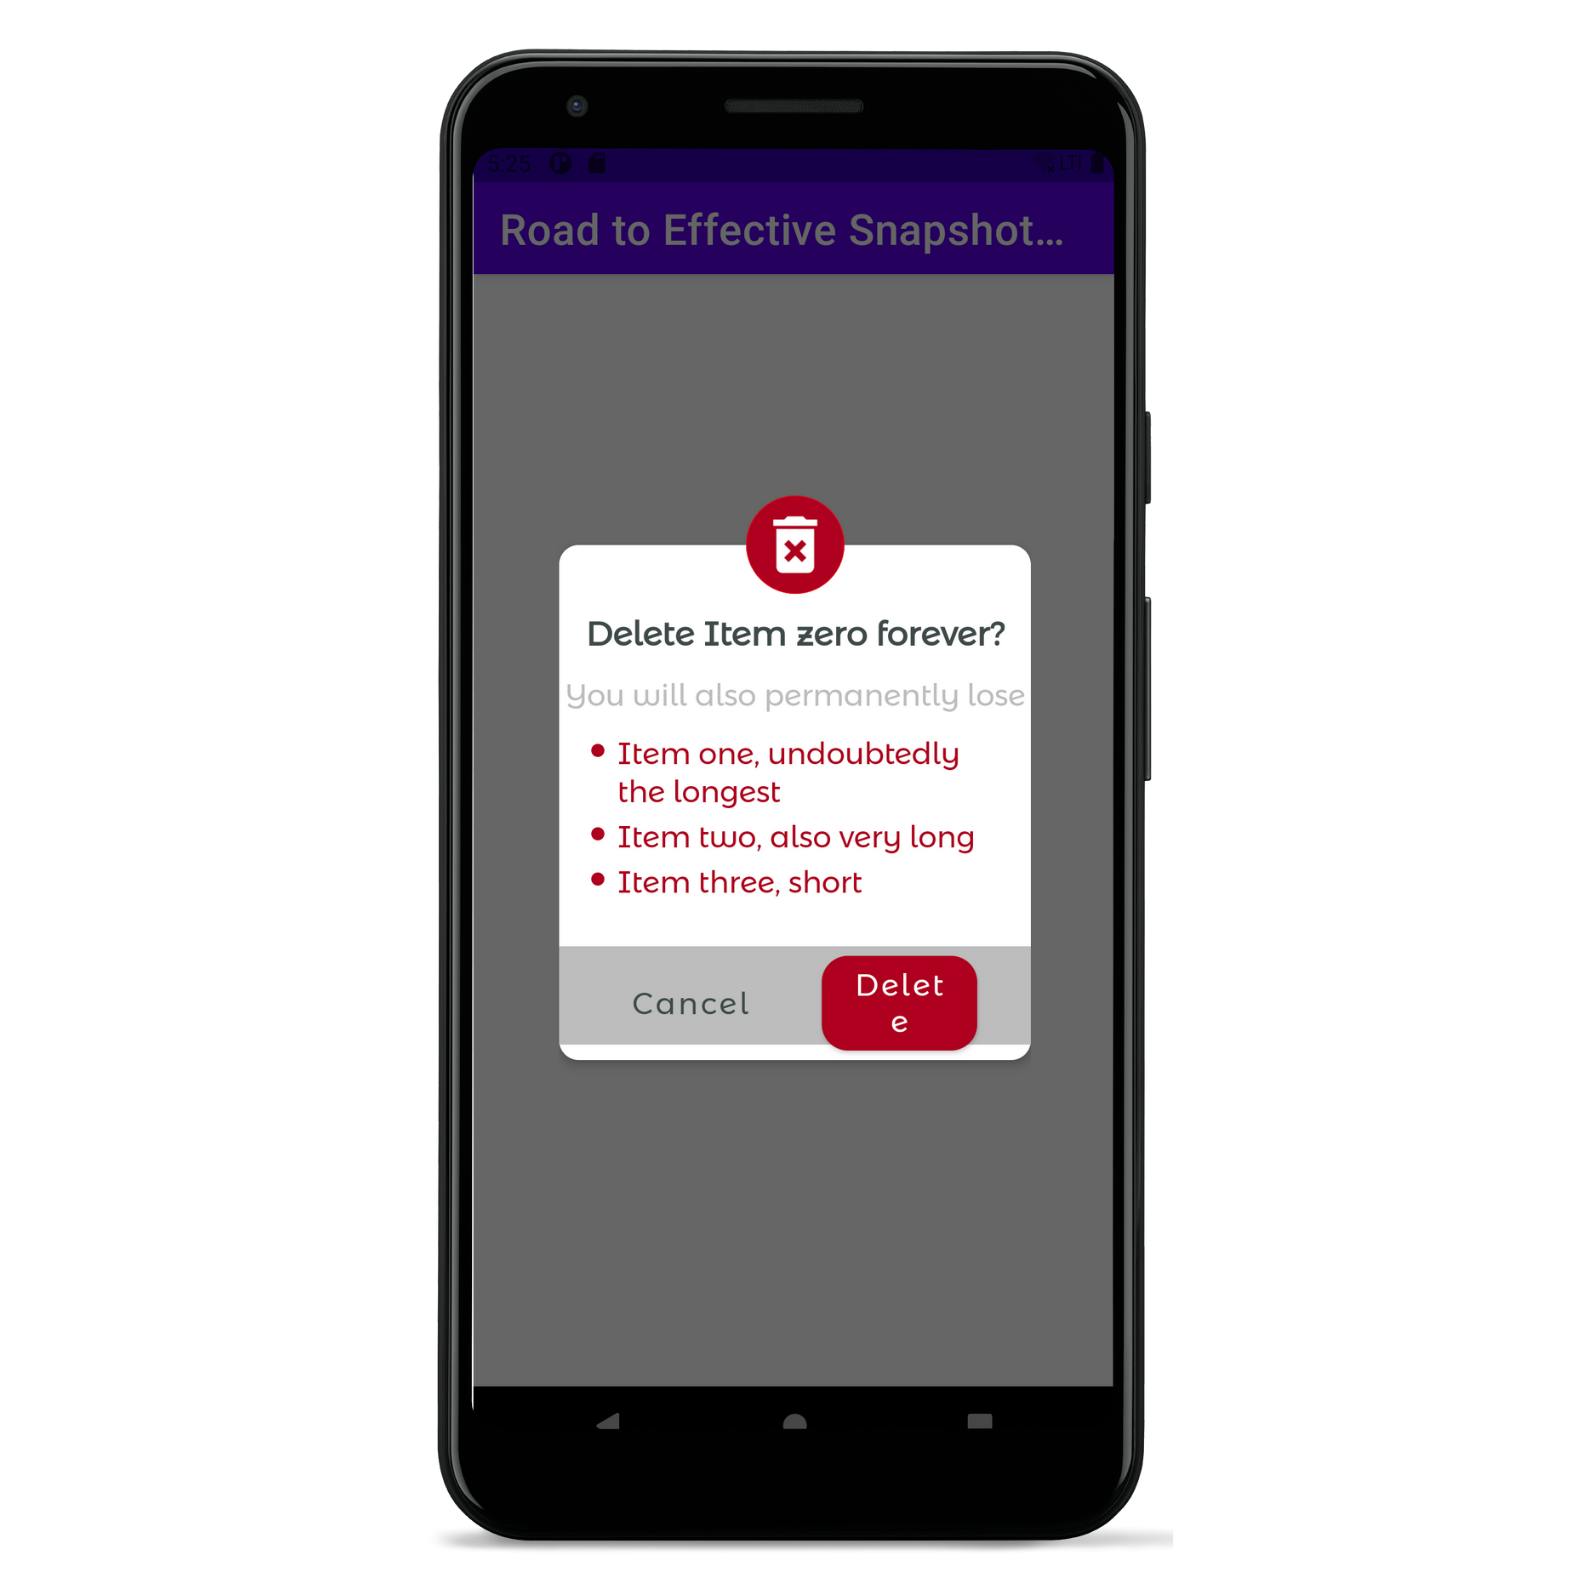
But just out of curiosity, you decide to change the font size to "Largest"/"Huge" in the device settings and see what it looks like. You can find font size options under Settings > Display > Font sizes. And this is what you get
You can download the corresponding code in this repo
Well... It seems that our layout looks broken on a device. We can conclude that checking the correctness of our layouts with the Layout Validation preview has therefore some limitations:
- Cannot display views added dynamically.
- Previews could break and might not be displayed properly or at all as consequence.
- Does not always display views as they would be on the device (although it is very accurate in most cases).
Take into consideration that the preview does not run on a device or emulator, so it emulates the Android view system. Therefore the points 2 and 3 mentioned above.
The good thing is that we can solve all those problems with snapshot testing. And even more important: we also gain the capability to automatically detect visual regression bugs across commits.
So let's see how snapshot testing works...
How snapshot testing works
Snapshot testing is different from traditional Espresso/UiAutomator Tests. First of all, it is important that all the snapshots are recorded and verified on emulators/devices with exactly the same specifications. That is because the verification is done pixel by pixel, comparing the snapshot taken as reference with the one the test records when verifying. Therefore, every developer teammate must create an emulator or obtain a device with exactly the same configuration for snapshot testing. The same goes for the emulator or device on the CI.
Before going ahead, it is worth mentioning that snapshot testing frameworks provide two main tasks:
- Record. When executed, it generates a snapshot file for each test that will be taken as reference
- Verify. When executed, it generates a snapshot file for each test that will be compared, pixel by pixel, with the one taken as reference when recording.
Once everybody in the team has agreed the same device setup for snapshot testing, the process goes as follows:
- Create a test that snapshots a view. This could range from a view dynamically inflated to the activity that is shown on the emulator/device screen.
- Make sure
adbonly lists the snapshot testing device/emulator. That is because instrumentation tests run on all emulators/devices adb detects. This might cause some issues like snapshot file duplication errors, longer running times, and the like. - Execute "record" locally to generate the corresponding snapshot files and open the corresponding PR containing them.
- Some teammates review the snapshots to confirm that it reflects the state of the view we are expecting. Once approved and merged, this Snapshot is taken as source of truth for future verifications of the tests.
- Verify the snapshots periodically (e.g. on every PR, once a day, etc.). Ideally you have a CI with a job configured to "verify" them. This means, it executes the snapshot tests with the most up-to-date code, and takes a screenshot. After that, it compares this screenshot with the last one uploaded to the CI or the one being pushed in the PR. If they both match, the test passes, fails otherwise.
Advantages and disadvantages
Pros
- Less costly to write and maintain than UI tests. Mostly involves inflating the view, setting its state and taking the snapshot. It does require little or no interaction with the UI in most cases. If needed, it is possible to use Espresso or UiAutomator with snapshot testing, they are not mutually exclusive.
- Much faster to run than UI tests. Depending on its complexity each test can run and record even in less than a second. Snapshot verification is a bit more time-demanding because it also involves comparing the snapshots with their corresponding references. I will also devote one chapter to reducing snapshot test execution times, for those having a large bunch of them.
- Catches visual bugs that only snapshot tests can. UiAutomator/Espresso tests can verify whether a view is shown, but snapshot tests are much more precise at asserting whether the view displays as expected.
- Help improve communication with designers and/or translators. Snapshot tests require teammates to confirm that the snapshot reflects the expected state of the view. By including designers and translators into their approval, we can catch design and translation bugs early before merging. The outcome is a decrease of the development costs of a feature, as well as an increase in the quality of the app overall.
- Very scalable. Write one test and make it run with every possible configuration. This is straightforward with Parameterized tests, what I will explain in the next article. However, if not done carefully, it can exponentially increase your building times. I will also give some advice on writing good snapshot tests in the following post.
Cons
- Any change in a view is treated as a regression bug unless a new test is recorded. You'll often find yourself in a situation in which you modify some layouts due to new requirements, push your code, and it fails on the CI because you have not recorded a new Snapshot of that layout reflecting those changes.
- Still not 100% automated. requires manual verification to know what is correctly displayed and what is not. Take the previous image as an example: How can you decide that the layout is broken without a human evaluating it? Or that a translation in a language is right? Or the colours in Dark mode are the ones expected?
- Flakiness. When getting into more complex views, flakiness starts showing up for apparently "no reason". But, take a breath. Most of these flakiness occurs for a reason and can be avoided. I will devote a full blog post on explaining how to find and get rid of such sources of flakiness.
- Emulator configuration. The most common approach to snapshot testing is to use emulators because they are the "cheap" option. However, this is more cumbersome than it looks like. You'll find yourself recording snapshot tests on the wrong device/emulator or wiping data from the emulator quite often to avoid errors due to insufficient storage. Verifying snapshot tests on the CI emulators? watch out for freezing emulators. And the show goes on... But again, do not worry about this too much. I will give some tips to mitigate all these issues in another post of this series.
Conclusions
Snapshot testing is a powerful tool if used properly, ensuring that your app looks as it should under any specification our app requires. The more configurations that your app supports (e.g. languages, dark/light theme), the more useful they might become. On the other side, its flakiness and configuration troubles are the main reasons why developers give up on them.
After this series you’ll get a very deep insight on snapshot testing and will be able to make the best out of them. We will not only discuss how to remove flakiness from snapshot tests and some tips to mitigate emulator configuration issues, but also how to write efficient snapshot tests and improve their speed once we got hundreds of them.
In the next article I will write about how to write efficient snapshot tests, including some examples.
Further links
You can find the repo that will be used for this series here, including the example used in this blog post.
This article was part of my talk "An Introduction to Effective Snapshot Testing on Android" at
I hope you enjoyed it. Do not forget to star the repository or subscribe to this blog to stay tuned!
You can find the next articles on snapshot testing of this series here, all of them featured in Android weekly!
- Design a pixel perfect android app 🎨: A story of UI/UX and screenshot testing
- UI tests vs. snapshot tests on Android: which one should I write? 🤔
- The secrets of effectively snapshot testing on Android
If you liked this article, you might also like other articles I wrote:
- Better unit tests with Parameterized testing
- Writing bulletproof code with Property-Based testing
- Styling dynamic Strings directly in Android xml with HTML markup
If you are interested in the content I publish, follow me on Twitter!
Cover image by Eduardo Barrios on Unsplash